Afterpay Express Checkout reduces the overall checkout steps on desktop and mobile so that shoppers can complete transactions more quickly. Customers checkout directly from the shopping bag or product page using their previously saved Afterpay information.
Simply – fewer checkout steps, higher conversion.
Express Checkout eliminates 5 steps and over 40 fields of customer-provided information.
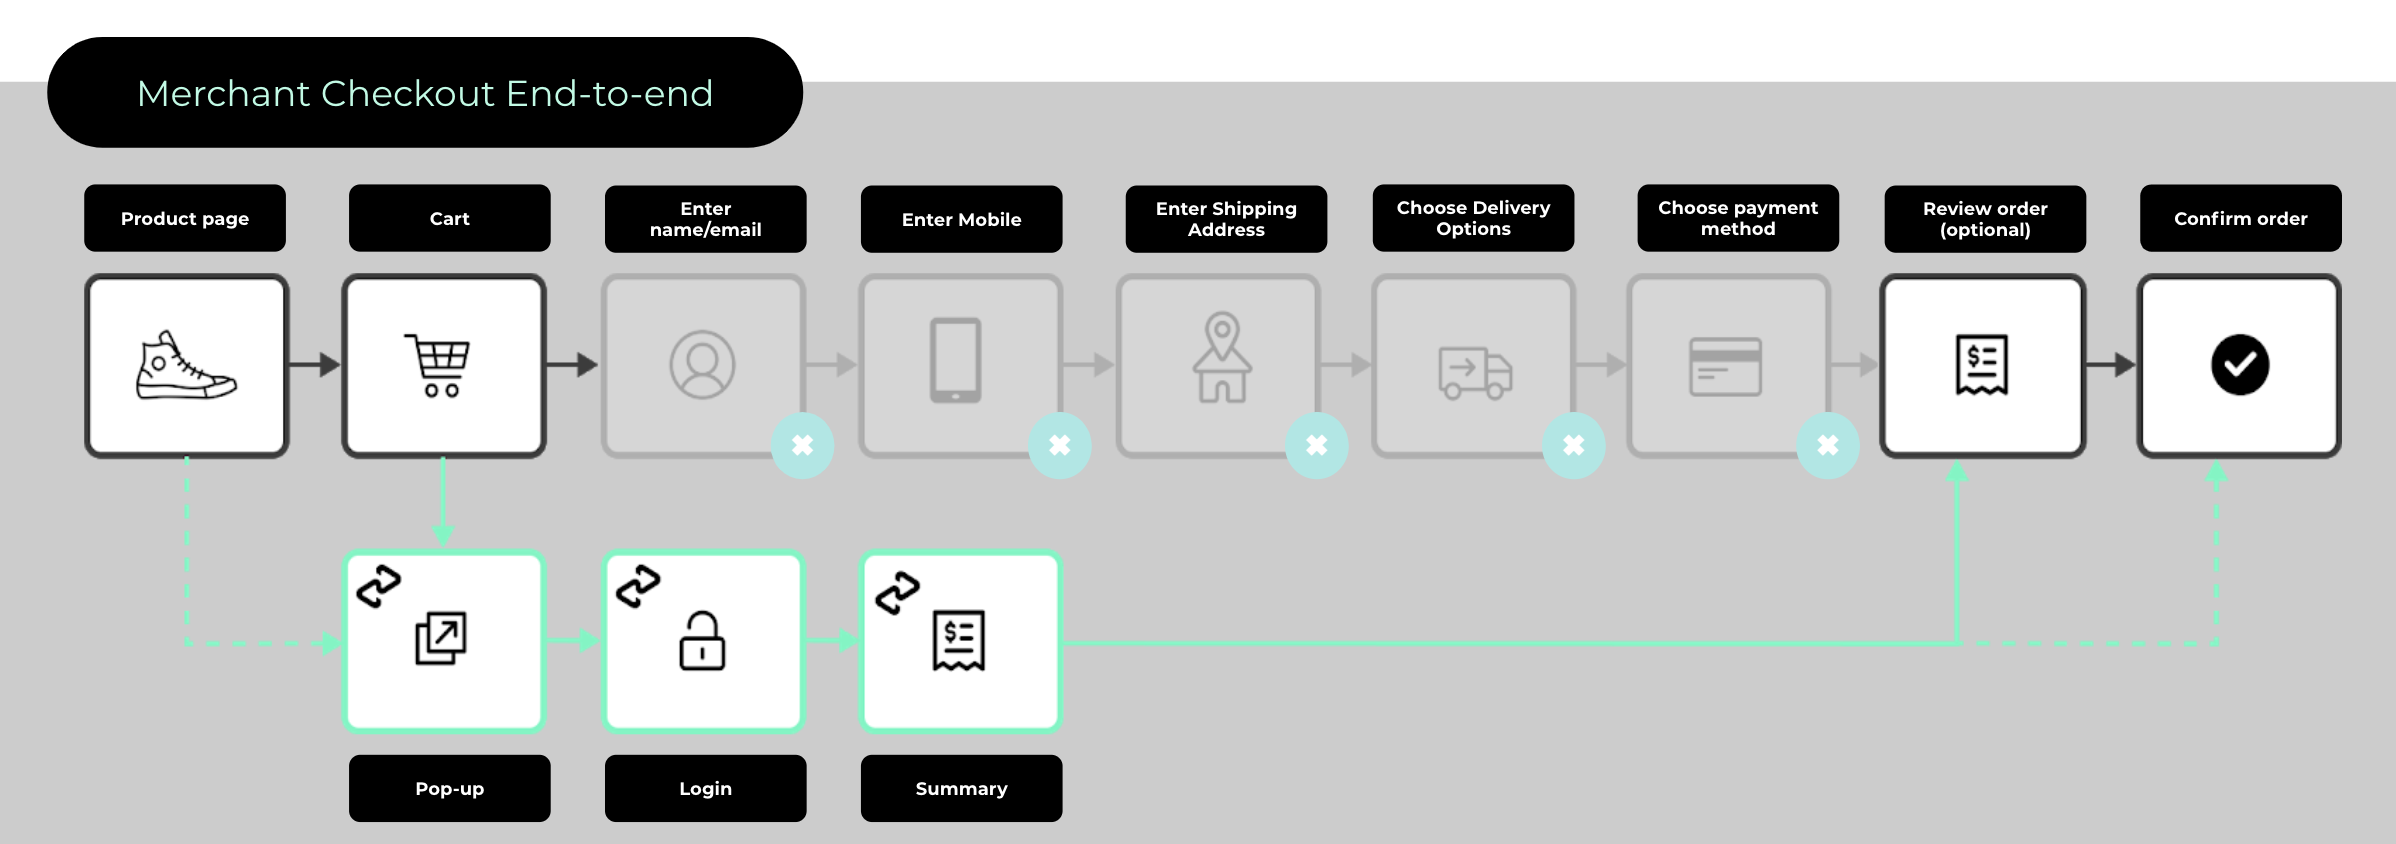
Standard Afterpay Checkout Flow
The customer proceeds through the checkout process on your site as normal, selecting Afterpay as a payment option and confirming the transaction before order placement.
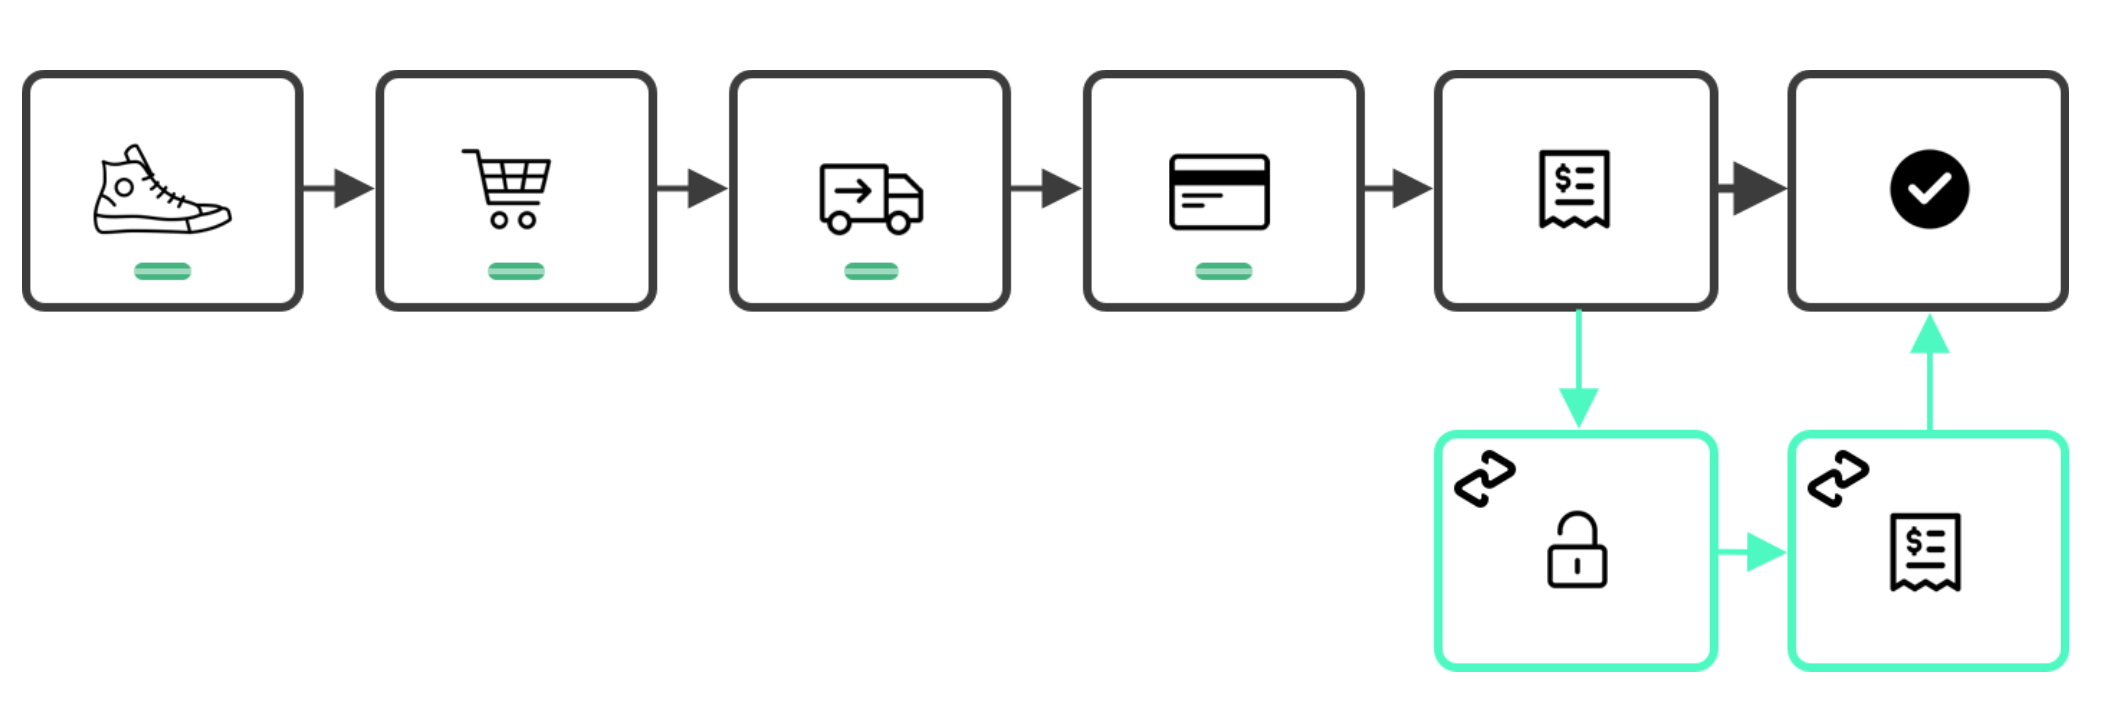
Express Checkout Flows (Cart and/or Product Pages)
Integrated Shipping: Delivery options are displayed to users in real time, with the ability to confirm the order within Afterpay.
Deferred Shipping: The user returns to the retailer site to finalize delivery options and complete the order.
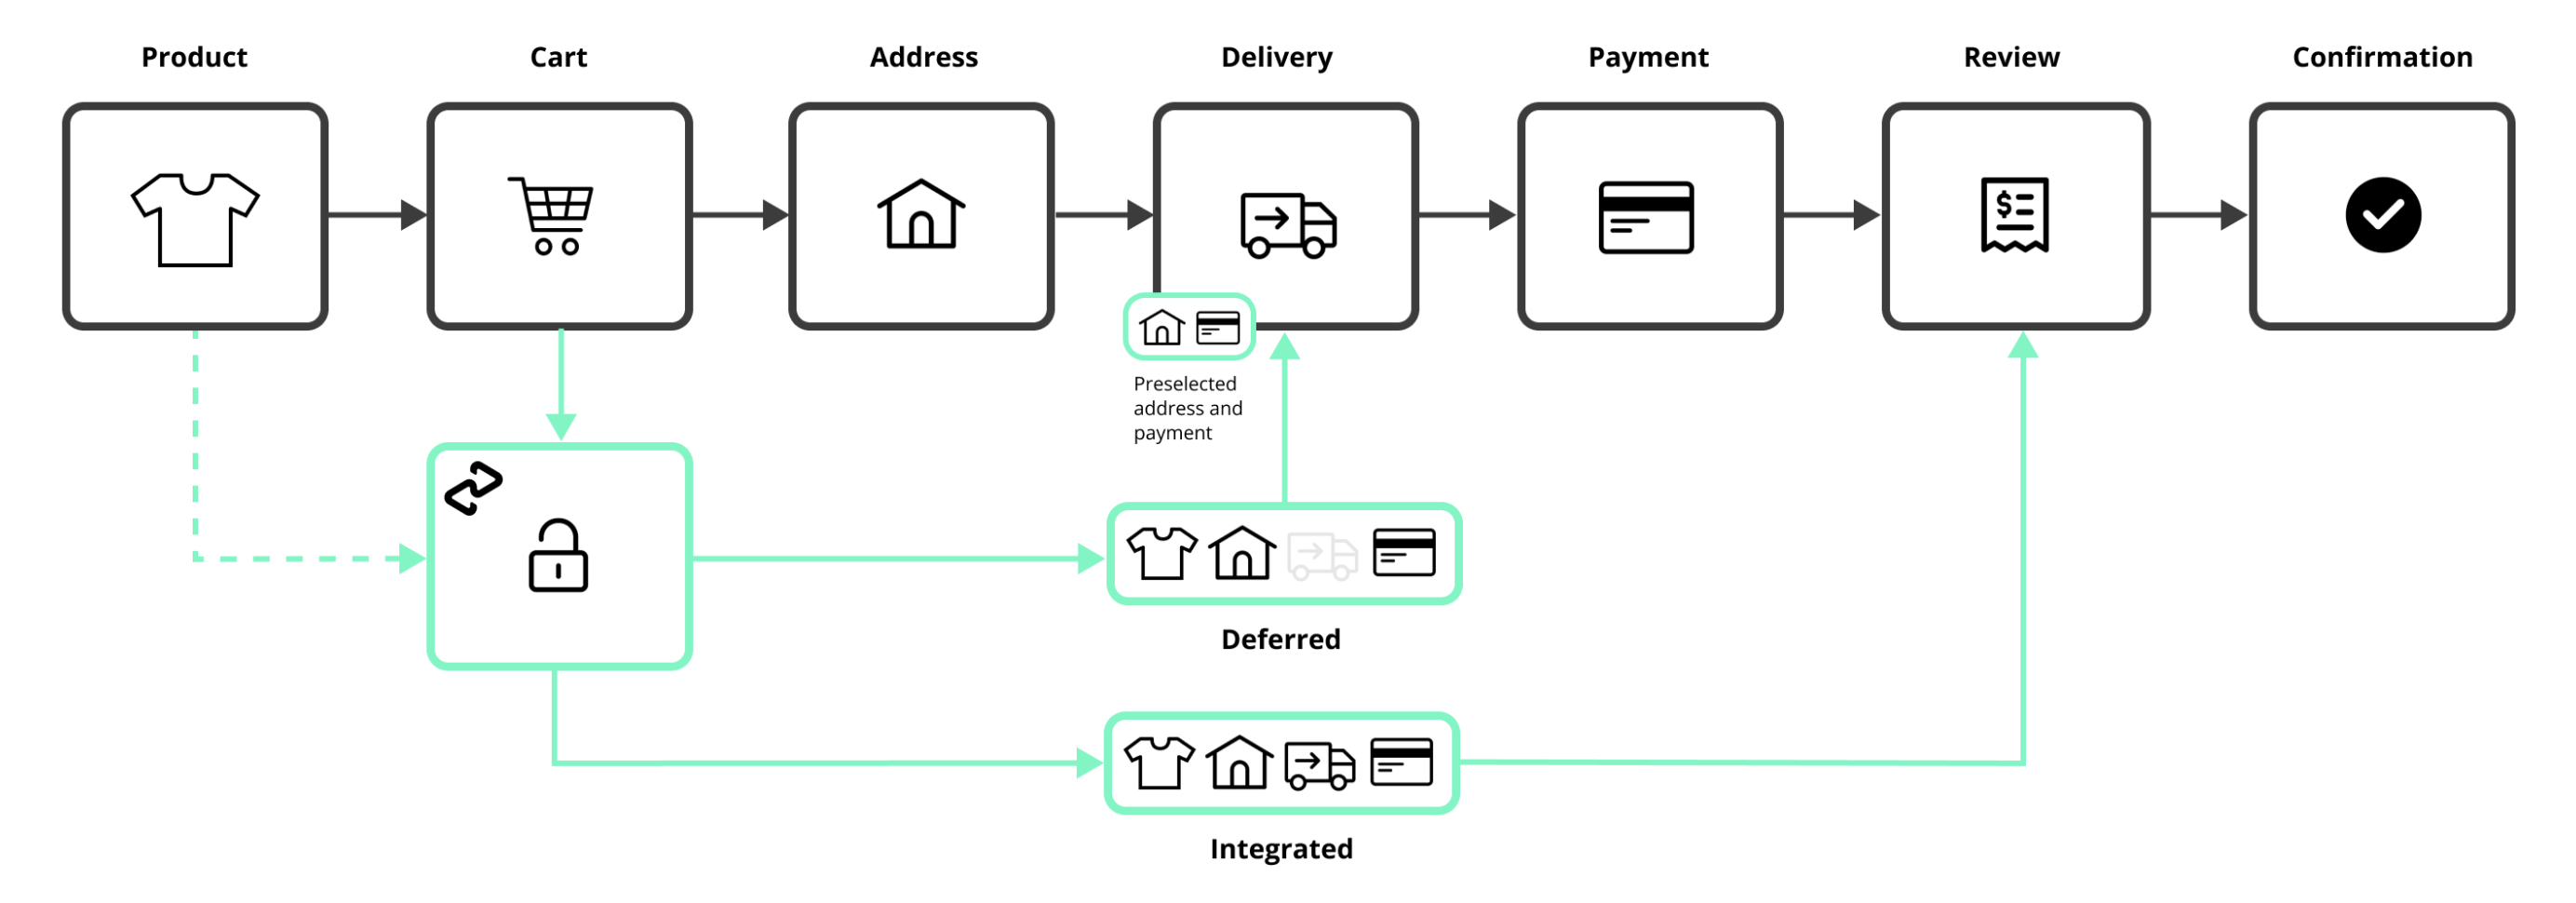
Suitability Test
| Integrated Shipping | Deferred Shipping |
|---|---|
| Less than 5 shipping options | More than 5 shipping options |
| Simple shipping options (i.e. single option for whole order) | Complex shipping options (e.g. individual options at SKU level) |
| Simple tiered shipping options (e.g. standard, express, rush) | Time Slot Booking |
| Pickup in-store option before checkout entry | Mixed in-store pickup and home delivery |
Adding the Afterpay Express Checkout Button
You must show an Afterpay checkout button on your cart and/or product pages to enable Express Checkout. When clicked, the Afterpay checkout button will start the checkout process in a popup flow (the redirect flow can optionally be used with Deferred Shipping).
Options for the Afterpay Button
There is a selection of buttons available for each stage of checkout – each clearly indicating the following action to the consumer.

Integration assets are available here, or contact your Afterpay merchant services representative.
Configure the Express Checkout Button
Afterpay can be launched from different entry points in the consumer journey. To enable a smart checkout flow, create an Afterpay checkout button on your web page, assign an ID, and set the afterpay-entry-point data attribute on the button to one of the following:
- product-page
- mini-cart
- cart
For example, a button that renders on the mini-cart:
 <button id="afterpay-button" data-afterpay-entry-point="mini-cart">
      Checkout with Afterpay
 </button>
Load afterpay.js
You need an Express Checkout Key from Afterpay to complete the following steps. Please contact your Afterpay Merchant Services representative if you do not have one.
To launch Afterpay Express Checkout you will need to add the afterpay.js script on your page and then replace YOUR-PUBLIC-KEY (see below) with your Express Checkout Key.
You will also need to set the onload attribute to point to your own function (e.g. initAfterpay) where you will perform the initialization of the popup. The contents of this function are detailed in the next section Initialize the Popup Window.
For example, loading the sandbox afterpay.js script:
<script src="https://portal.sandbox.afterpay.com/afterpay.js?merchant_key=YOUR-PUBLIC-KEY" async onload="initAfterpay()"></script>
Initialize the Popup Window (Express Checkout - Product/Cart Pages)
Inside your own onload function (e.g. initAfterpay), use afterpay.js to initialize the popup window by invoking initializeForPopup. The following properties will then need to be configured:
-
Set
countryCodeto the two-character ISO 3166-1 country code of the Merchant account -
Set the flag
shippingOptionRequiredto: -
false: if shipping options are not required to be displayed in the Express Checkout flow
-
true: if you intend to provide shipping options to to the consumer within the Express Checkout flow (i.e. Integrated Shipping). This is the default value
-
Set
targetto the ID (or class if multiple buttons need to be targeted on the same page) assigned to your button that will trigger the checkout process -
Handle lifecycle events:
-
onCommenceCheckout: This is where the retrieval of the afterpay token from your server will happen. Once retrieved, start the checkout process you will need to call
actions.resolve(TOKEN) -
onComplete: see The onComplete Callback section below for more details
-
Full Example with Deferred Shipping
<html>
  <head>
    <script>
      // ensure this function is defined before loading afterpay.js
      function initAfterpay () {
        AfterPay.initializeForPopup({
          countryCode: 'US',
          onCommenceCheckout: function (actions) {
            /* retrieve afterpay token from your server */
            /* then call `actions.resolve(token)` */
          },
          onComplete: function (data) {
            /* handle success/failure of checkout */
          },
          target: '#afterpay-button',
          shippingOptionRequired: false,
        })
      }
    </script>
    <script src="https://portal.sandbox.afterpay.com/afterpay.js? merchant_key=YOUR-PUBLIC-KEY" async onload="initAfterpay()">
    </script>
  </head>
  <body>
    <button id="afterpay-button"
    data-afterpay-entry-point="mini-cart">
      Checkout now with Afterpay
    </button>
  </body>
</html>
During Afterpay Express Checkout
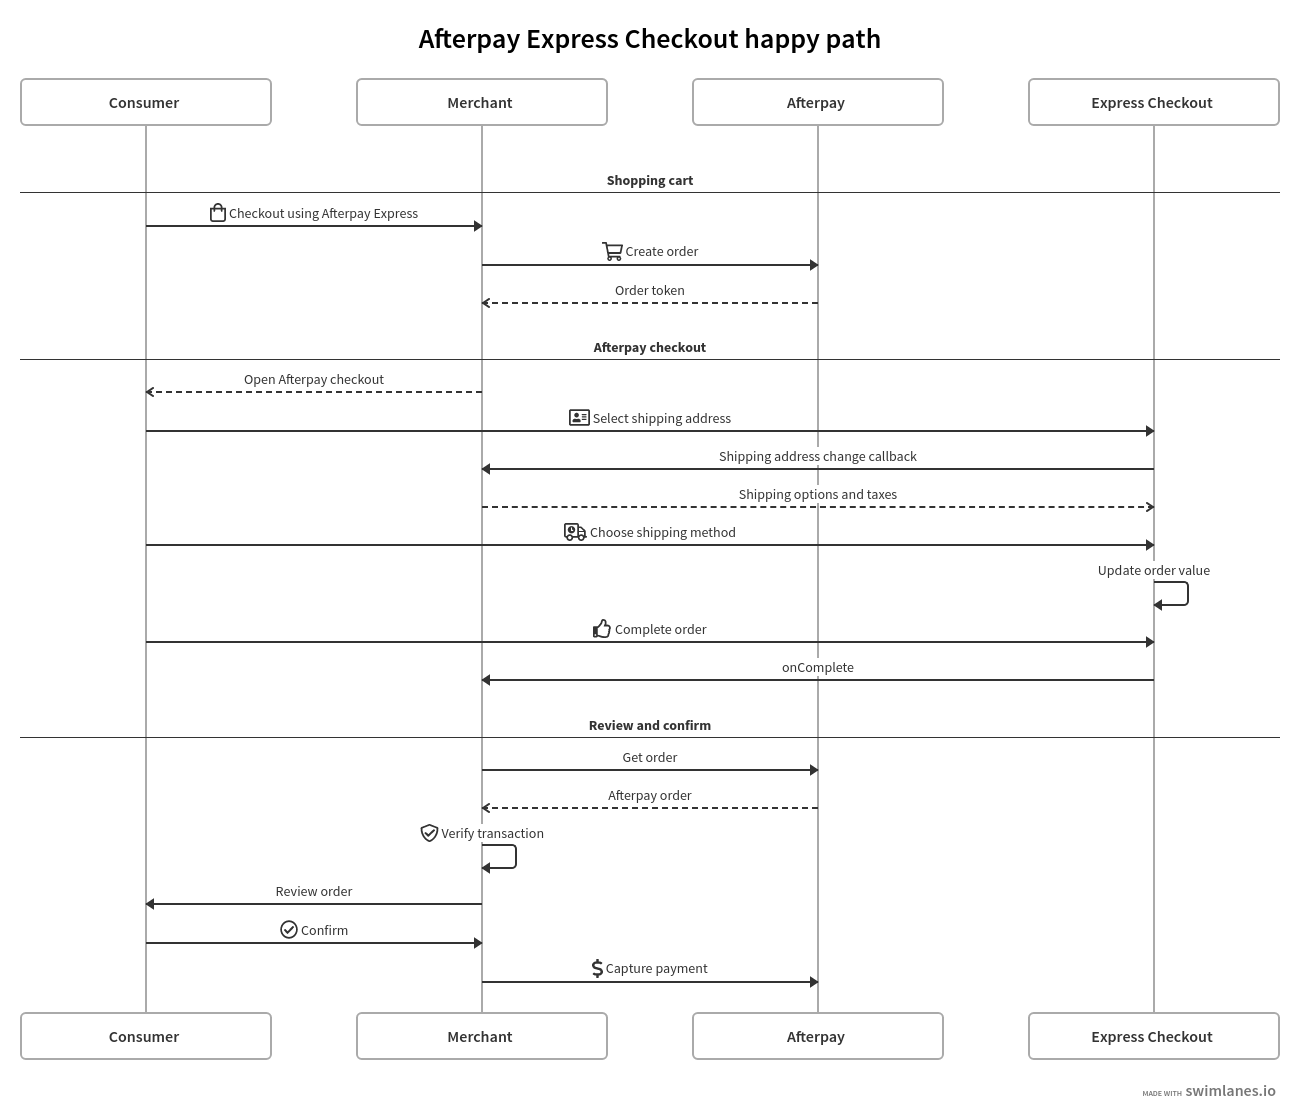
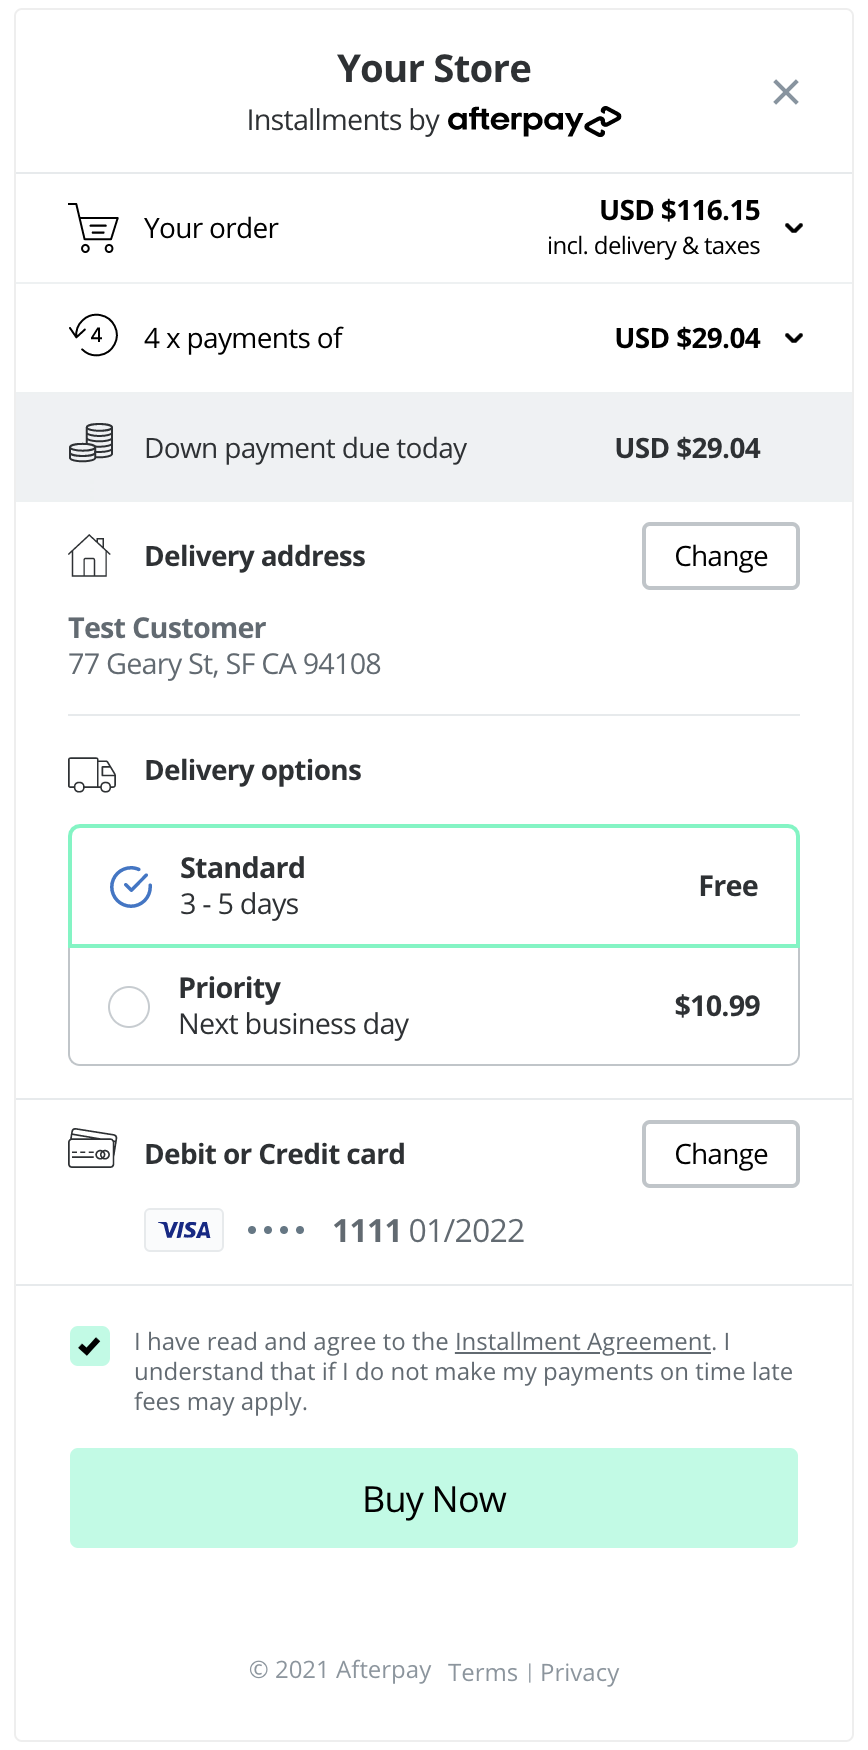
When the user clicks the Afterpay checkout button, a popup will launch and they will be prompted to login and review their order details. They can choose a payment method and delivery address, and, if you are using Integrated Shipping, they will also be presented with shipping options for that address.
Once they confirm their details on Afterpay, the popup will close and they will return to your site. Your page will be notified of the completion via the onComplete callback.
The onComplete Callback
When the consumer completes the Express Checkout flow, a call is made to the onComplete Javascript function. This function is passed an event argument with a data field event.data, which has the following properties:
| Property | Type | Description |
|---|---|---|
status | String | The order status: "SUCCESS" or "CANCEL" |
orderToken | String | The order token provided when initializing the checkout |
merchantReference | String (optional) | The merchant's ID or reference number for the order |
AfterPay.initializeForPopup({
          // ...
          onComplete: function (event) {
            /* handle success/failure of checkout */

            if (event.data.status == "SUCCESS") {
              // The consumer has confirmed the payment schedule.
              // Call your server here to retrieve the order details

            } else {
              // The consumer cancelled the payment or closed the popup window.

            }
          },
        })
Retrieve the Express Checkout Order Details
Retrieve all transaction details using the Afterpay Get Checkout API:
curl --request GET \
  --url https://global-api-sandbox.afterpay.com/v2/checkouts/YOUR-TOKEN \
  --header 'accept: application/json'
Verify the Transaction
A transaction integrity check must be performed to ensure that the transaction is valid. After receiving the onComplete callback, call your server to validate the transaction:
Compare the Afterpay order returned by the Get Checkout API with your own records.
| Property | Type | Description |
|---|---|---|
amount | Money | Total amount to be charged to consumer. |
consumer | Consumer | Contains the user's givenNames, surname, and email. Note that phoneNumber will not be included here. |
shipping | Contact | Contains the user's shipping address with full details. |
shippingOptionIdentifier | String | Integrated Shipping only. The ID corresponding to the shipping option chosen by the user. |
This should be used as the “source of truth” for the order, and will include the consumer name, email address, delivery address, and order total.
Additional Verification
Passing the total order amount when you call the Auth (or Capture if using the Immediate Payment Flow) endpoint allows Afterpay to perform its own validation.
Complete the Express Checkout Process
After retrieving the order details, you may choose to either capture payment immediately or continue the checkout on a review page. To capture payment and complete the transaction immediately, make use of Integrated Shipping with the Buy Now feature.
If you intend to continue the checkout on your site, you should:
- Pre-fill your review page using the Afterpay order details
- Allow the user to select a delivery method (unless using Integrated Shipping)
- Optionally offer the ability to change order details and enter promo codes
- Display the Afterpay checkout widget on the final review page or at all steps of your checkout
The Afterpay Checkout Widget is mandatory if your checkout makes any changes to the order total after returning to your site.
Integrated Shipping
This feature improves the user experience by embedding your shipping options directly into the Afterpay Express Checkout flow. It streamlines the checkout process and can be combined with the buyNow flag to create a one-stop checkout that immediately precedes the order confirmation page.
We recommend the Integrated Shipping flow for merchants with:
-
Fewer than 5 shipping options
-
Single shipping option for an entire order (i.e. no SKU level options)
-
Simple tiered shipping options (e.g. standard, express, rush)
-
Pickup in-store option before checkout entry
Integrated Shipping is configured in the call to initializeForPopup triggered by the Express Checkout button.
It requires shippingOptionRequired to be true (enabled by default) and an onShippingAddressChange callback must be defined:
AfterPay.initializeForPopup({
  // ...
  shippingOptionRequired: true,
  onShippingAddressChange: function (data, actions) {
    /* address in `data` */
    /* calc options, then call `actions.resolve(options)` */
  },
});
Full Example with Integrated Shipping
AfterPay.initializeForPopup({
  countryCode: 'US',
  onCommenceCheckout: function(actions) {
    /* retrieve afterpay token from your server */
    /* then call `actions.resolve(token)` */
  },
  onShippingAddressChange: function (data, actions) {
    /* required for Integrated Shipping  */
    /* address in `data` */
    /* calc options, then call `actions.resolve(options)` */
  },
  onShippingOptionChange: function (data) {
    /* optional - chosen option in `data` */
  },
  onComplete: function (data) {
    /* handle success/failure of checkout */
  },
  target: '#afterpay-express-button',
  buyNow: false,
  pickup: false,
  shippingOptionRequired: true
})
Integrated Shipping is enabled by default for Express orders. To disable it,
shippingOptionRequiredmust be set to false.
Restrictions
Integrated Shipping requires the Express Checkout flow to be launched as a popup, due to the way shipping information is communicated over the frontend. The redirect method is not supported.
Listening for Address Changes
The Shipping Address Change callback is a feature of the Express Checkout. This callback allows a merchant to dynamically update shipping options and taxes based on the shipping address chosen by the consumer.
The shipping address change callback is required:
- If you intend to update the order total based on a chosen shipping address.
- To validate that you can ship to the selected address.
To set up the Shipping Address Change callback, implement the onShippingAddressChange function. This function will be passed two arguments: data and actions.
How the shipping options are calculated is entirely managed by the merchant. They can be calculated in Javascript or by handing off to an internal API.
If shipping options are available for the given address, they can be returned to Afterpay using the resolve action as shown in the code example below. Similarly, the reject action is used when shipping is unavailable.
Example retrieving shipping options via API
AfterPay.initializeForPopup({
  // ...
  onShippingAddressChange: function (data, actions) {
    fetch('/your-shipping-endpoint', {
      method: 'POST',
      headers: { 'content-Type': 'application/json' },
      body: JSON.stringify(data),
    }).then(function(options) {
      actions.resolve(options)
    }).catch(function(error) {
      // Parse the response and send an AfterPay rejection, e.g.:
      actions.reject(AfterPay.CONSTANTS.SHIPPING_UNSUPPORTED)
    })
  },
})
Example calculating shipping options in JS
AfterPay.initializeForPopup({
  // ...
  onShippingAddressChange: function (data, actions) {
    if (data.countryCode !== 'US') {
      // Reject any unsupported shipping addresses
      actions.reject(AfterPay.CONSTANTS.SHIPPING_UNSUPPORTED)
    } else {
      // Calc shipping inline
      actions.resolve([ {
        id: '1', name: 'Standard', description: '3 - 5 days',
        shippingAmount: { amount: '0.00', currency: 'USD'},
        taxAmount: { amount: '3.18', currency: 'USD'},
        orderAmount: { amount: '34.99', currency: 'USD'},
      }, {
        id: '2', name: 'Priority', description: 'Next business day',
        shippingAmount: { amount: '10.99', currency: 'USD'},
        taxAmount: { amount: '4.28', currency: 'USD'},
        orderAmount: { amount: '47.08', currency: 'USD'},
      } ])
    }
  },
})
Afterpay calls your onShippingAddressChange function when:
- The consumer first enters the Afterpay summary page
- The consumer makes a change to their shipping address on the Afterpay summary page
Afterpay provides the following parameters to your onShippingAddressChange function:
data parameter: This contains the consumer’s selected address with fields:
suburb,state,postcode, andcountryCode
action parameter: This object is used to return your response to the Afterpay checkout. It consists of the following methods:
-
resolve: Call this method to provide the shipping options applicable to the consumers address. Takes an array of Shipping Option objects. -
reject: Call this method when you are unable to handle the request. Do not throw an error, instead call this method with a Shipping Constant as the first argument to indicate a status, e.g.:
actions.reject(AfterPay.CONSTANTS.SHIPPING_UNSUPPORTED)
Shipping Option model
| Attribute | Type | Description |
|---|---|---|
id | String (required) | A shipping option identifier. Max length 128 |
name | String (required) | The name of the shipping options |
shippingAmount | Money (required) | The shipping amount (without tax, if including taxAmount) |
taxAmount | Money (optional) | The tax amount |
orderAmount | Money (required) | The total amount for the order including shipping and taxes |
description | String | A description for this shipping option |
Shipping Constants
To indicate a number of error scenarios, actions.reject() may be invoked with a provided constant.
These are of the form AfterPay.constants.<NAME>, where <NAME> is one of:
| Constant | Description |
|---|---|
SHIPPING_ADDRESS_UNRECOGNIZED | Unrecognized address |
SHIPPING_ADDRESS_UNSUPPORTED | Recognized address, but will not ship there |
SERVICE_UNAVAILABLE | General service error. |
Afterpay Express Checkout does not perform any arithmetic. It is the responsibility of your web app to calculate the correct total. Each shipping option must have a total order amount including taxes and shipping.
Listening for Shipping Option Changes
The onShippingOptionChange callback allows a merchant to track the user’s chosen shipping option as it changes. It is optional, and will be called each time a user selects a shipping option. This function is passed one argument: data
data parameter (object): This contains the consumer’s selected shipping option, as provided in the response from onShippingAddressChange, with fields:
| ID | Name | Description | Shipping Amount | Order Amount |
|---|---|---|---|---|
id | name | description | shippingAmount | orderAmount |
AfterPay.initializeForPopup({
  // ...
  onShippingOptionChange: function (data) {
    console.log(data)
  },
})
Listening for Warning/Error messages
To facilitate handling of logging/warning/error messages, AfterPay.onMessage can optionally be replaced with a custom function. The default function is:
AfterPay.onMessage = function (payload) {
  console[payload.severity](payload.message)
}
Buy Now
When the Express Checkout is complete, you may either call the Auth endpoint immediately or continue checkout on your review page. If you are authorizing (or capturing) payment immediately, set the buyNow flag to true - this shows the user a “Buy Now” button at the end of their Afterpay journey.
AfterPay.initializeForPopup({
  // ...
  buyNow: true,
})
Configuring a pickup order
The Express Checkout experience can be tailored for Click & Collect and other pickup flows by following these steps:
-
Allow your users the ability to choose pickup options before they select Afterpay Express. This should include any decisions that may impact the cost of delivery, for instance pickup location and date.
-
If the user has opted for pickup, provide the chosen pickup address when creating the order via the
shippingbody parameter -- e.g
curl --request POST \
  --url https://global-api-sandbox.afterpay.com/v2/checkouts \
  --header 'accept: application/json' \
  --header 'content-type: application/json' \
  --data '{"amount":{"amount":"10.00", “currency”: “USD”}, “mode”: “express”, "merchant": {"popupOriginUrl": "https://example.com"}, "shipping": {"name": "Your Store Name", "line1": "123 Store Address", "postcode": "0000"}}'
- When invoking
initializeForPopup
- Set the pickup flag to true.
- Configure your
onShippingAddressChangehandler to return the name and description of their pickup choice. This will likely mean returning only a single option -- e.g
actions.resolve([ {
  id: 'pickup-store-123', name: 'Click & Collect',
  description: 'Available for next-day pickup',
  shippingAmount: { amount: '0.00', currency: 'USD'},
  taxAmount: { amount: '3.18', currency: 'USD'},
  orderAmount: { amount: '34.99', currency: 'USD'},
} ])
- Depending on your configuration, your frontend may have already invoked
initializeForPopupbefore knowing whether the user will opt for pickup.
It is safe to invokeinitializeForPopupmultiple times; each call will overwrite the previous settings. In this case you may choose to callinitializeForPopupin response to the user selecting a pickup option.
- You may choose to collect additional information regarding the pickup, e.g. electing another person to pick up the order, at your order review page. These details must not affect the order total.
